Spectrum Next Z80 dev environment
Having already dabbled with NextBuild, I wanted something as simple to use.
Searching the internet and groups, had provided snippets of information in setting this up, but nothing exactly what I was looking for.
I have finally got it all working, so thought I would share my experience in this blog of how I got it all together, in the hope it would benefit others and save the struggles I went through.
What I was looking to achieve
My goal was to set up an all-in-one process where I could code in an IDE / Text Editor, press build within this and then have it run through the emulator.What I didn’t want was to code and then have to save and start typing in the terminal to run a BAT file to build/run. I wanted a simple all in one process.
Software used
First off it should be mentioned I am using Windows, for any other operating systems like Mac or Linux, you would have to amend to suite.For the editor I used Sublime Text, I should imagine you could do the same with VSCode, however I like the simplicity and layout of Sublime, so chose this.
The assembler, I used sjasmplus and the emulator, CSpect.
Of note, some tutorials mention the use of hdfmonkey and the creation of an SD image file for CSpect. In my set up, I found this is not required.
Folder structure
Before downloading any of the software, I set up my drive folder structure. I wanted all the files to be in one Next development folder and then within this, a projects folder to contain all my various source files.The drive in my case is the C drive and I wanted everything in a folder called SpecNextDev.
This is what I did:
C:\SpecNextDev
        \cspect
                [All the files from the downloaded CSpect folder placed here]
        \sjasmplus
                [All the files from the sjasmplus folder placed here]
        \Projects
                \Project1
                \Project2
                \HelloWorld
So for example, if I wanted to create a HelloWorld project, within Projects I would create a folder called HelloWorld and my code file within this would be called HelloWorld.asm
Downloading the software
See here to direct you to the web sites for downloading:Link to Sjasmplus
There was one other download required to set up syntax highlighting and build/run settings for Sublime Text , “z80asm.zip”
I have only been able to find this on the Spectrum Next Facebook group, as it had been provided by Michael “Flash” Ware.
There was one other download required to set up syntax highlighting and build/run settings for Sublime Text , “z80asm.zip”
I have only been able to find this on the Spectrum Next Facebook group, as it had been provided by Michael “Flash” Ware.
This file is an updated one by Michael containing Next specific syntax. As a bonus it also contains a nice dark colour theme.
If there is another location for this file, then please let me know and I will update the link.
Setting up the software
Most of this is really quite simple and I won’t insult your intelligence in explaining how to install for example, Sublime Text. Simply run the downloaded install file and follow the steps.For CSpect and sjasmplus, download these zip files to your computer somewhere, unzip them and copy all the folders/files within to the previously created folder structure for each.
Ensure “CSpect.exe” and “sjasmplus.exe” are included with these.
To ensure CSpect works correctly with sound, in the extracted CSpect folder, there is a program called “oalinst.exe”. This is the OpenAL installer.
Just open this and install following the steps.
If you want to test that CSpect is working correctly with sound, navigate to the CSpect folder you created with it’s contents and run a couple of .bat files.
“beast.bat”
“mod_player.bat”
Both are good examples to test.
The z80asm file should be unzipped somewhere on your computer and then the z80asm folder needs to go into the Sublime Text packages folder, here:
C:\Users\~~NAME~~\AppData\Roaming\Sublime Text\Packages
“~~NAME~~” This would be your user name within the users folder.
When complete you should have a directory like this containing all the files contained in the zip:
AppData\Roaming\Sublime Text\Packages\Z80asm
Before we do anything else, you will see that where you have copied the z80asm files in the folder above, there are 2 files called “build.bat” and “run.bat”
These are the 2 files which will be called when selecting from Sublime, however first we need to edit these for our Next development environment.
Open the “build.bat” using Notepad to edit it.
Once open, select and delete all the text you can see, so it is now a blank page.
Copy and paste this new script into the now blank area:
@echo off
rem ----------------------------------------------------------------------------
rem This script builds the source.
rem It first sets the path of sjasmplus.exe
rem Then it checks to see if the source file exists
rem It will then build with sjasmplus
rem   * The “–zxnext=cspect” will allow you to add the “break” and “exit”
rem      instructions in your code to trigger the debugger in Cspect.
rem      The “exit” instruction will just quit Cspect.
rem   * The “–msg=war” will tell sjasmplus to only output warnings and
rem      errors and not spam you with tons of information about other things.
rem ----------------------------------------------------------------------------

set ASM="C:\SpecNextDev\sjasmplus\sjasmplus.exe"

rem Check if .asm source file exists
if not exist %1 (
    echo Source file not found!
    set errorlevel=1
    goto :end
)

"%ASM%" %1 --zxnext=cspect --msg=war

:end
As you can see, it sets the relevant paths to build the source file using sjasmplus.
Make sure you save and then do similar to the “run.bat” file.
Open the “run.bat” using Notepad to edit it.
Once open, select and delete all the text you can see, so it is now a blank page.
Copy and paste this into the now blank area:
@echo off
rem ----------------------------------------------------------------------------
rem This script runs the CSpect emulator.
rem It first checks that .nex and .map files have been created with build
rem It then runs CSpect with EMUL for the location
rem Change CSpect parameters to suite
rem ----------------------------------------------------------------------------

set DIR=%~dp1
set EMUL="C:\SpecNextDev\cspect\CSpect.exe"

rem Check if .nex and .map files exists
if exist "%~n1.nex" (
    if exist "%~n1.map" (
        "%EMUL%" -r -brk -w3 -50 -vsync -zxnext -nextrom -map="%~n1.map" -mmc=%DIR% "%~n1.nex"

        goto :end
    )
)

echo No image file found!

:end
Again make sure you save the file to replace itself.
Look through the script and you can notice it runs the previously built file using CSpect.
This will all be automated now through Sublime.
Within the z80asm folder, you might have noticed there is a bat file called “buildrun.bat”, we don’t need to edit this one, but if you want to open it and have a look you will notice it first runs the “build.bat” file and then “run.bat”.
So when we select build and run from within Sublime, it will start “buildrun.bat” to compile and run our code in CSpect, in one quick and easy step.
All files created in the build/run process, will be placed in our specific project folder.
For example:
\HelloWorld
        \HelloWorld.asm
        \HelloWorld.nex	- [created from Sublime]
        \HelloWorld.map	- [created from Sublime]
This allows us to use the environment for multiple projects with ease.
We are nearly ready to try some code!
Code example
Open Sublime Text.Before we enter some code, let’s use Michael’s colour theme.
From within Sublime select, Preferences and Color Scheme. You should see the theme “z80asm (Flash)” to select. That’s it!
The code to try is from the Spectrum Next site.
Select from the menu, File and New File. Before saving the file with a name, select the syntax being used. This is at the bottom right of the Sublime window.
It may say “Plain Text”.
Select this and a menu will open. If you scroll down you can then select “Z80 ASM”.
Now save the file with File, Save As.
Make sure you save the file in the directory SpecNextDev\Projects created earlier, however create a new folder in here to save this .asm source file.
Example: SpecNextDev\Projects\HelloWorld\HelloWorld.asm
Save the file the same name as your new folder – HelloWorld.asm
This will help to keep all your projects organised and named in their own folders.
Now that is all complete we are ready to put some code in this new .asm file with Sublime!
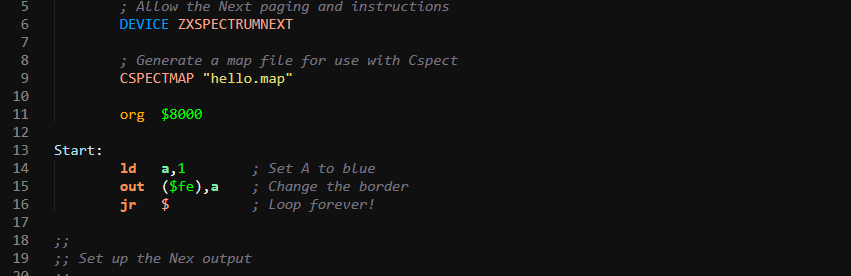
Copy and paste the code below taken from the Spec Next Site and save with File, Save.
;; ;; Sample code ;;
   ; Allow the Next paging and instructions
    DEVICE ZXSPECTRUMNEXT

    ; Generate a map file for use with Cspect
    CSPECTMAP "NAME.map"

    org  $8000

Start: ld a,2 ; Set A to RED out ($fe),a ; Change the border jr $ ; Loop forever!
;; ;; Set up the Nex output ;;
   ; This sets the name of the project, the start address,
    ; and the initial stack pointer.
    SAVENEX OPEN "NAME.nex", Start, $ff40

    ; This asserts the minimum core version.  Set it to the core version
    ; you are developing on.
    SAVENEX CORE 2,0,0

    ; This sets the border colour while loading (in this case white),
    ; what to do with the file handle of the nex file when starting (0 =
    ; close file handle as we're not going to access the project.nex
    ; file after starting.  See sjasmplus documentation), whether
    ; we preserve the next registers (0 = no, we set to default), and
    ; whether we require the full 2MB expansion (0 = no we don't).
    SAVENEX CFG 7,0,0,0

    ; Generate the Nex file automatically based on which pages you use.
    SAVENEX AUTO
Final step is here!!
If you look at the test code, there are 2 file names which create the .map and .nex files. These should be on lines 9 and 24 in this example.
Change where it says NAME to the same name as the .asm file.
For example in this test we named it “HelloWorld.asm”
So change these 2 lines:
CSPECTMAP "NAME.map"
SAVENEX OPEN "NAME.nex", Start, $ff40
To:
CSPECTMAP "HelloWorld.map"
SAVENEX OPEN "HelloWorld.nex", Start, $ff40 Now the fun bit!
From within Sublime, select from the menu, Z80ASM.
You should now see “Build and Run” from the drop down. Select it.
Of note you can select “Build” on it’s own and then “Run” after if you wish.
That is it, you should now see your program running within CSpect!!!
Hope this has helped in some way, have fun. 👾


Comments
Post a Comment